|
|
||||||||||||||||||||||||||||||||||||||||||||||||||||||||||||||||||||||||||||||||||||||||||||||||||||||||||||||||||||||||||||||||||
| Calculators |
| JDM Supra JZA80 Wiring Diagrams - courtesy of Alex, Moscow |
|---|
 |
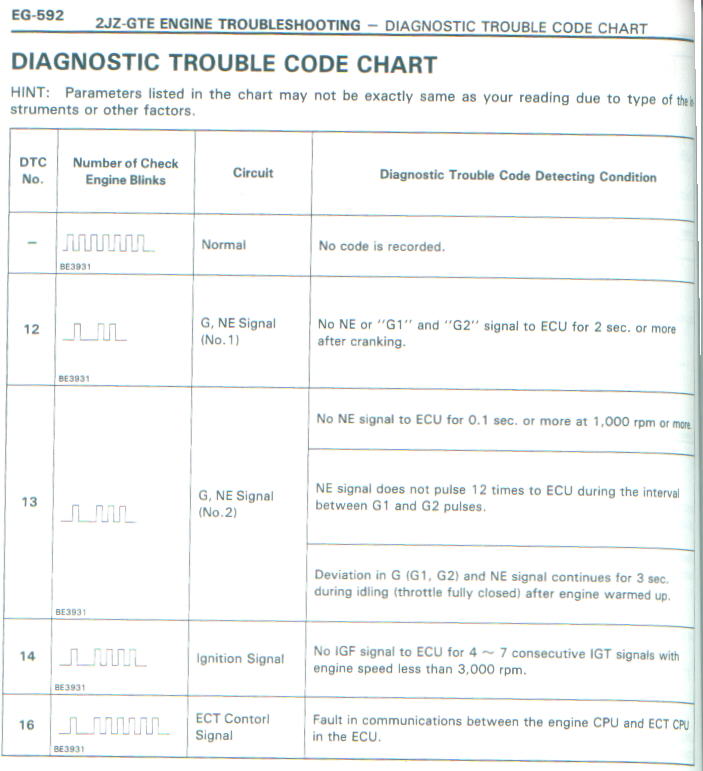
| List of OBD-I engine diagnostic codes and how to read them | |||||||||||||||||||||||||||||||||||||||||||||||||||||||||||||||||||||||||||||||||||||||||||||||||||||||||||||||||||||||||||||||||||
|---|---|---|---|---|---|---|---|---|---|---|---|---|---|---|---|---|---|---|---|---|---|---|---|---|---|---|---|---|---|---|---|---|---|---|---|---|---|---|---|---|---|---|---|---|---|---|---|---|---|---|---|---|---|---|---|---|---|---|---|---|---|---|---|---|---|---|---|---|---|---|---|---|---|---|---|---|---|---|---|---|---|---|---|---|---|---|---|---|---|---|---|---|---|---|---|---|---|---|---|---|---|---|---|---|---|---|---|---|---|---|---|---|---|---|---|---|---|---|---|---|---|---|---|---|---|---|---|---|---|---|---|
|
You activate the engine check codes by placing a small length of copper wire between TE1 and E1 in the engine diagnostic circuit box. NOTE: ODB2 engines (mid 1996+) use Tc and E1 instead. There are actually 2 boxes that contain these circuits and you can use either one. One is in the engine bay near the throttle body (my favourite) and the other is under the drivers footwell at around knee height.
You read the diagnostic codes on the engine check light which is to the right of the drivers steering wheel (RH drive vechicles)
at the level of the top of the steering wheel. For example, if you have a code 31, it will blink 3 times then 1 time, pause then repeat.
If you have more then one code, then it will display them all in order and then continue to repeat them.
| |||||||||||||||||||||||||||||||||||||||||||||||||||||||||||||||||||||||||||||||||||||||||||||||||||||||||||||||||||||||||||||||||||
| Automatic TT gearbox Specifications |
|---|
|
The TT Auto gearbox (A340E) is a very strong auto, but it can break if you are running over 350rwkw especially if drag racing with sticky tires. This auto is unique to the 2JZ-GTE engine, despite many other Toyota autos also being labelled as A340E autos. It has one extra clutch pack, a larger oil sump and a different torque convertor to the NA auto. The 350rwkw limit is well below the safe limit of the Getrag 6 spd gearbox (around 900rwkw), so if you are making serious power, make sure you are using the Getrag box. The W58 5 speed that comes with the non-turbo 2JZ-GE engine can only take around 260rwkw before it will break especially if drag racing with sticky tires. The 2JZ-GE auto can only safely handle around 200rwkw. You can make the TT auto box survive longer if you manually change gears when you race it, as this puts most of the torque loading during gear changes through a stronger part of the auto. Also you can get the solonoids upgraded so that it changes gear faster, as this reduces the loading on the auto during gear changes. This will allow for up to 350 rwkw. For it to survive beyond that, you will need very expensive strengthening of internal parts that is offered by several USA Auto transmission companies. When suitably strengthened (at much cost) the auto gearbox can then handle up to around 600rwkw. |
| Aftermarket suspension parts & kits |
|---|
|
Whiteline produce 3 ready made suspension kits for the JZA80 Supra. The top of the range kit will set you back $A1700, but includes Selby springs, adjustable Koni (yellow) shocks, solid front & rear sway bars, as well as heavy-duty bushes.
|
| How to tell when you've blown a turbo or two |
|---|
|
Sometimes you will get clouds of blue/black smoke coming out your exhaust system and then you definitely have a blown turbo or two. Blown #1 turbo - Even with the "pedal to the metal" you will get no boost at all below 4000rpm and after 4000rpm you should then get a gradual boost increase from the #2 turbo when it starts working. Blown #2 turbo - at around 4000rpm when you have the "pedal to the metal", the boost will suddenly drop away to around 3-5psi boost and then slowly climb back up to around 10psi. Depending on how it is blown you will get from 3-10psi max boost, which will all be from the #1 turbo. Several other problems can appear to produce very similar symptoms to a blown turbo. You could have a problem with any of the 3 actuators that control the sequential action of the turbos. These will usually need to be checked before assuming a turbo is blown, unless as mentioned you have black smoke coming out the exhaust. |
| Boost basics - boost cut and overboosting |
|---|
|
Boost Cut - occurs at around 16psi (depends on weather conditions as to exact pressure) if you try turning the boost above the stock level of 11psi. It feels like something broke in the engine when it happens and can be quite disconcerting the first time it happens. If you want higher boost (and who doesn't?) then you will need a boost cut defender to go above 16psi. The most popular one is Greddy and it is wired in down near the ECU which is under the passengers feet at the front of the passengers footwell. Overboosting - easy to achieve if you remove the cats and put on a HUGE diameter exhaust system, say around 85-90mm in diameter and have good free flowing mufflers. Boost can run away and you will get 25+psi and very quickly destroy your engine. The reason for this is that the Mkiv TT Supra only has one wastegate, which is on the #1 turbo (the front one) and its only 20mm in diameter which is no where near large enough when you install a very free flowing exhaust system. Overboosting is when the boost is going to a higher pressure then the control systems (usually the wastegate) are trying to keep it to. This can be a problem when the exhaust system is severly modified as most modern turbocharger systems rely on exhaust backpressure as part of the means of controlling the maximum boost pressure. For example, on the Japanese mkiv Supra; if you install a 3" downpipe and a 3" exhaust system back to a high flow muffler, you will reduce the back pressure on the turbos to such an extent, that the single wastegate will not be able to cope. This is because the exhaust gas is now finding it easier to flow through the turbos (and thus produce boost) then it is to flow out the wastegate. Boost pressure of 25+ lb's can easily occur in this situation (and it did on my 3˝" system), which will soon destroy your motor as detonation is now very likely. The simpliest remedy to this situation is to increase the backpressure in the exhaust system. You can put the original front cat back and this will get you down to about 17lb boost. Or, you can reduce the size of the downpipe (to about 2Ľ" - 2˝") or you can put a 3-5mm thick stainless steel gasket, with a internal diameter of about 2Ľ" - 2˝" where the downpipe mates to the cast exhaust manifold. This will bring your overboosting down to reasonable pressures (less than 20psi), but still probably above stock boost of 11lb. The 2˝" downpipe is the method I have used to limit the overboosting on my mkiv (now boosts to a max of 19psi), it's simple and it works and it also gives more ground clearance, useful if the car is lowered. There are other ways to reduce the overboosting, but they can be quite expensive. You could have the wastegate on the #1 turbo machined out and a larger one fitted, but it still may not be big enough to solve your overboosting. You could have an external wastegate fitted to supplement the standard wastegate, but this would be difficult due to lack of room, and also expensive. You could have the turbine housings machined out to allow more room for exhaust gas to flow around the turbine blades. This may take several goes to get it right and if you machined out too much of the housing, you could find its now not producing enough boost. Also expensive as the turbos would require removing and installing, possibly several times, along with associated machining costs. Variable exhaust gas flow valve(s) after the turbos or a variable intake flow valve could possibly be setup to control the maximum boost levels, but this is getting very experimental, and would require a reliable boost pressure feedback mechanism for it to work effectively. Food for thought? If you ever do have the #1 turbo off for any reason then you can drill out the wastegate to around 28mm which would certainly help. The export Mkiv TT has a 30mm wastegate so we Japanese Mkiv owners are at a big disadvantage there. |
| Best boost controller for the Supra |
|---|
|
Here’s some info that I pulled down from mkiv.com regarding electronic boost controllers (EBC’s), and their suitability for the Supra: Blitz DSBC - holds boost at the level you set no matter the temp. Reduced to no boost spiking. Very tiny. Shows all boost and info on green lcd screen. The unit has 4 boost settings and a scramble boost setting by turning a small knob. Apexi AVCR - basically the same features as said about the DSBC, but has an ATM sensor and it's own TPS. Costs more. A lot larger. Shows injector duty cycle. Led display. The unit has 2 boost settings by 2 distinct buttons. Greddy Profec B - cheap, no frills, no accurate boost holding. Doesn't take temp into consideration. No display. Unit has 2 boost settings. Kinda like an electronic bleeder T setup in which you have 2 different sized Ts it switches between. That's the best way I can describe how it holds boost levels. HKS ECV4 - delegate to single turbo or TTC. Fuzzy Logic worth it? I've heard no. But I have no idea. Not worth it for sequential. Expensive. Profec A - same as above except I've heard it's harder to program. Expensive. Sard Trigger - this is a nifty 60mm gauge design. LED display. Has 2 boost settings by buttons w/ scramble boost. I would compare it's accuracy with the Profec B as I'm almost positive it doesn't have a temp sensor to adjust. I think it's simple and easily placed into a vent. If it had the boost accuracy and control of the DSBC, I would have gotten it instead. But the whole idea of using an EBC is to have accurate control right? And lets not forget the cheapest boost controller of them all, the manual bleeder valve. For around $20 you can have a rather crude but effective means of achieving whatever boost level you desire. This involves bleeding off boost pressure before it reaches the VSV which controls the #1 turbos wastegate actuator. I have used a brass ball valve with a 6mm hole teed into the pipe before the VSV. By slowly opening the valve you can gradually increase boost levels to whatever is desired. Remember if going above 16psi you will need a boost cut defender. |
| Upgrade your small brake Supra to USA/Jap post May 95 BIG brakes |
|---|
|
The original Japanese TT mkiv Supra came out with the same brakes as the NA from May 1993 to May 1995. After May 1995 Toyota having realised this was a bad move decided to start using the BIG brakes that were always on the export model TT Mkiv from when it was first made. The move to big brakes on the Japanse Mkiv TT's was a piecemeal affair with only some TT's having the big brakes and only after May 1995. The BIG brakes are an straight bolt-on although you will have to either bend the backing plates out of the way a bit or remove them entirely as I did. You can buy second-hand ones from the USA (where all the TT's have them) or even purchase new ones from Toyota as they were available on the post May 95 Japanese Mkiv's. The big brakes are a very worthwhile upgrade as they are 25mm overall bigger diameter and have twice the number of pots at each wheel and as a result the car stops alot quicker and feels much safer. They have 4 pot front, 2 pot rear versus 2 pot front, 1 pot rear on the NA's and early TT's. The standard 16" Supra wheels will not fit the big brakes which require the factory 17" wheels or aftermarket wheels with suitable spacing to the spokes. You need about 65mm gap from the inside of the front spokes to the flat side of the brake rotor to have sufficient room to clear the huge 4 pot calipers. Not many standard wheels have sufficient clearance so check carefully before buying them. |
| Cleaning Plastic Headlights |
|---|
|
The discoloration you see is inside the headlights usually...in some cases outside only. The procedure requires popping your lights into the oven for about 5 minutes at low temperature (be careful or you will damage the light), then removing the plastic casing. From there, you need to polish the plastic with a good plastic polish and scratch remover. Using the right product is important, you don't want to be leaving scratches and nicks on the plastic surface. Use a product such as Novus, Plexus, or Meguiar's plastic cleaner/conditioner. You will certainly want to use Novus, as it will leave the final surface very clean and shiny. A high speed polisher will save you a lot of time and effort. Although, it can be done by hand and some elbow grease. Websites that carry the Novus and Plexus are listed below. You can also find them at other websites by doing a search for 'novus plastic cleaner' or 'plexus plastic cleaner.' Novus: http://www.noscratch.com/novus/form.shtml Plexus: http://www.plexusplasticcleaner.com/ Silicone/RTV sealant: can be bought at local car parts stores for about $10 in a small tube. Sand paper: use 2000 Grit paper, and wetsand the outside of the headlights using a soapy water solution. Your headlights will be crystal clear and smooth. Also, follow up by buffing the sanded surface with the plastic polish/cleaner. Oven Temperature: about 175-200F for about 5-10 mins, depending on the actual temperature of the oven. Leave the headlights in there until they are somewhat warm to the touch. Start at one end of the headlight, and use a dull object such as a butter knife of dull screwdriver to separate the headlights. WARNING: Be careful when heating the headlights as they will melt if the oven is too hot or you leave them in too long.
|
| Replacement clutches |
|---|
|
When I blew my stock clutch, I replaced it with an RPS Turbo Clutch Carbon. RPS are based in the USA, and are actually the people who make the TRD single-plate clutch for TRD USA. The RPS Turbo Clutch is the equivalent of the TRD single-plate clutch, but for $US50 more you can get the Turbo Clutch Carbon (TCC), which is still considered to be a “civilised” clutch, and is good for about 75hp more than the normal TC. Beyond that and you have to go to either a twin-disk clutch of a puck-type clutch. The kit includes the carbon clutch plate (which itself looks like a piece of art) and a new pressure plate. You have to supply new clutch pilot & throw-out bearings. A couple of things to be careful of when you install a new clutch. Until it beds itself in (which will take about 1000kms), the new clutch (especially the carbon ones), will behave like a puck-type clutch. That is, it’ll be like a switch – either all on or all off. You’ll either have to do a full-on launch every time you want to start off or stall. It’s just something that you have to put up with while the clutch beds itself in. Do NOT try & slip the clutch while it is bedding itself in, as this will damage the clutch plate. Don’t worry, once it starts to bed itself in the new clutch will become more and more civilised. My TCC behaves almost like the stock clutch now. |
| Coolant type to use |
|---|
|
Any reputable off-the-shelf coolant which is suitable for turbo cars, does not contain any alcohol (ethanol corrodes aluminium, which happens to be what the engine head is made of), and preferably doesn’t contain any silicates (apparently stuffs up the water pump in the long term), is fine. Adding a bottle of Redline Water-Wetter to the mix doesn’t hurt either. |
| Resetting the ECU |
|---|
|
Resetting the ECU is probably the first thing that should be done if the engine starts to behave erratically, and you believe that it’s computer related. Either unplug the battery (make sure to disable any alarm on the car before doing this), or pull out both of the main EFI fuses in the main fuse box in the engine bay. Leave the battery cable/fuse unplugged/out for a couple of minutes & then reinstall. |
| Euro-spec bonnet hood part numbers & installation? |
|---|
|
Here are the part numbers for the hood-scoop that comes on the Euro-spec Supras. Any competent panel beater should be able to install it.
76181-14900 Bulge, Hood |
| Exhaust System Upgrading |
|---|
|
If you have just bought a Mkiv Supra (NA or TT) and it still has the std exhaust system on it then you should immediately upgrade the exhaust system. The std exhaust system is quite restrictive on the mkiv Supra (non-mandrel 2˝" system on the TT) and gains of 10-15kw at the wheels can be obtained from the TT and around 5-10kw at the wheels from the NA. The best thing about this upgrade is it makes the engine run more efficiently, so you get better mpg and lower exhaust temperatures. What size exhaust pipe diameter should I install?If you have an NA then I would use a mandrel bent (bends where the pipe diameter is maintained) 2˝" (65mm) system and I would use a 3" (75mm) to 3˝" (90mm) system on the TT depending on how loud you want the car to be. Also with the TT you have to consider how much back pressure you have in the rest of your exhaust system, as too little backpressure will allow the boost to run away. This can happen because the single wastegate on the #1 turbo is not large enough by itself to control boost pressure but relies on exhaust back pressure to help keep the boost under control. What's all this talk about downpipes on the TT?The downpipe is considered to be approx. the first 3ft (1m) of exhaust pipe straight after the turbos. On the stock mkiv, this includes the first cat. The size of the downpipe diameter determines to a large extent how much backpressure your exhaust system can generate. Have this pipe too large and you will get runaway boost. Around 3" diameter is generally the maximum you can get away with on a TT but it does depend on whether you have any cats in the exhaust system. What should I do about the Cats?If you are legally allowed to, then you will get the best performance by removing them entirely. If you have to legally have them, then install high flow cats that match your exhaust pipe diameter. However, I have heard of people who "gut" the cats out making them into a straight pipe on the inside. This would not be easy on the mkiv Supra as the material inside the cats is pretty strong and would require alot of chiseling to get it out and you would then have trouble passing emmision controls with them removed. Which muffler size and type is best?A straight through muffler generally gives the least backpressure and hence the best power for your car. I use a 3˝" In-Out AdrenalinR mufflers on my TT 6 speed with a 3˝" exhaust system. This design also offers minimal backpressure and are fairly quiet as well. Also, the muffler inlet and exhaust pipe sizes should match the diameter of your exhaust piping for best results. To reduce droning from the exhaust system you will need a resonator (with the same inlet and outlet diameter as your exhaust system) installed as well. The resonator is a small straight through muffer, usually installed half way between the engine and the tailpipe. Should I remove the stock dual exhaust pipes before the muffler?There is no flow advantages from maintaining the dual factory setup and if you are installing a complete new exhaust system then I would definitely remove them. They only add extra weight and complexity to the exhaust system. |
| Brake/clutch/PS fluid types? |
|---|
|
Brake/Clutch Fluid – Castrol UltraStop Dot-4 fluid, although any Dot-4 fluid from a reputable manufacturer should be fine. Power Steering Fluid – Castrol Dexron III Automatic Transmission Fluid (ATF), although, again, any Dexron III ATF from a reputable manufacturer should be fine. |
| FSC - Free Speed Limit Removal |
|---|
|
On the US model, pulling the fuse to the traction control ECU will remove the Speed Limiter but on the Japanese spec Supra
it will not disable the Speed Limiter. You will need to buy an aftermarket Speed Limit Remover such as the Greddy device. Interestingly my Supra TT does not have a speed cut remover (that I can find anyway) yet I have done 250 km/h with no problems. I believe the previous owner to me may have cut a wire somehwere to achieve this but I don't know which one. |
| Free Fuel Cut Problem |
|---|
|
Do NOT use the free fuel cut (as used on the USA spec mkiv's) as it does not work on the Japanese Supra's, due to them using MAP sensors instead of Mass Airflow sensors, as the airflow input to the computer. What happens is it makes the revs rise and fall about 2000rpm, in a cycle over several seconds. I know, I tried it! Not good! |
| Fuel types - 96 & 98 RON? Will Supra run on these? Additives? |
|---|
|
Coming out of Japan, the Supra is happiest with 100RON fuel. The stock computer handles 98RON fuel (eg Shell Optimax, BP Ultra etc) quite well, and will tolerate 96RON (normal) premium, but forget normal (91RON) unleaded. If the car was fitted with an aftermarket ECU while it was still in Japan, it will almost certainly have been programmed to take advantage of the 100RON fuel over there (ie boost increased, timing advanced to the max), which means that it will just ping & detonate itself to death when it’s brought down here. Avoid unless you’ve got a stock ECU handy. Of all the octane boosters on the market, the only one that I’ve found that actually seems to work is R104+ (black bottle). Keep a bottle or 2 handy in the boot, & add half a bottle to a full tank of fuel when you’re out in the country somewhere & can’t find premium unleaded. Using these once in a while is okay, but according to the tech articles on http://www.mkiv.com, long-term use will leave red/orange deposits on the valves. New Zealand now has two suppliers of 98 octane fuel (BP Ultimate and Mobil 8000). Basically the higher the octane the better with turboed cars so use the highest octane fuel you can. Gull is looking into bringing out a fuel with 5% methanol in it which should be good octane, but no specifications are available yet. |
| Bosch Fuel pumps |
|---|
|
Bosch make a range of aftermarket fuel pumps that can be used with the Supra. Choose either 1 or 2 pumps to get the required fuel flow. All pumps except the 040 are external pumps, but they can be mounted in the tank as long as you use a fuel 'sock' to pre-filter the fuel before the pump sucks it in. The Bosch 044 pump is the only one worth doing as a single pump upgrade, otherwise you must use twin pumps.
NOTE: The std Japanese Supra fuel pumps supports around 280-300 rwkw at 20psi boost pressure, if the pump, fuel filter and injectors are all clean and working correctly. |
| Getrag 6 speed transmission (V160 & V161) |
|---|
|
The Getrag used in the Supra is the Getrag 233, 6 speed gearbox, which is made by Getrag in Germany .
NOTE: Although only rated to 361 ft/lbs by Getrag, this gearbox is used in cars putting out up to 800 ft/lbs of torque, but as with any gearbox, the more you exceed the rated torque capability, the quicker the gearbox will wear out, or if the torque is too high, something will break. On the street, its almost impossible to break the Getrag gearbox as wheelspin will occur before the breaking point is reached. On the drag strip with sticky tyres, it is possible to break the Getrag, if running 800rwkw or more. Normally the syncros will give up the ghost before something breaks as they take the main punishment during gear changes on the high HP cars. |
| Getrag 6 speed transmission noise |
|---|
|
The Getrag 6-speed gearbox is made to handle over 600hp. Like most gearboxes of this calibre, finesse is not one of its strong points. Here are the normal sounds for the 6-speed: 1. Rattle at low rpms, sounds kind of like there’s a heap of rocks or ball-bearings in there. 2. The odd thump that seems to occur when you put in into 1st gear. 3. Mine makes a hissing type of sound when I let the clutch out at idle. No vibration, just a hissing sound. I goes away when the clutch is pressed in. 4. Rattle or noisy reverse, normal! Mine makes all of these noises yet, drives perfectly. |
| Rear Hatch Rattle |
|---|
|
If you are getting a funny rattling noise from the rear of the car then its most likely to be the hatch rattling. There are two rubber bump stops (one on each side of the bottom of the hatch) and these go hard with age and allow the hatch to start rattling. You can buy brand new ones from Toyota and thats the best option. They can be pretty hard to remove and a impact driver with a phillips socket piece may be required to undo the phillips screw they use to hold them on. |
| Injector Upgrades |
|---|
When should I upgrade my Injectors?If you are running more then 18psi boost on the stock turbos then you will be getting near the limit of the injectors. Injectors are actually a type of electric solenoid and will overheat if run at 100% duty cycle for extended periods of time. Duty cycle is the percentage of time that they are open and flowing fuel. The accepted standard is not to run injectors beyond 80% duty cycle for other then very short periods. Injector Impedance TypesThere are two impedance levels with injectors, and these are high and low impedance injectors. The Japanese 430cc injectors are high impedance and the USA 550cc injectors are low impedance. If you want to swop from high to low impedance injectors you will need to add resistors into the injector circuit to reduce the impedance. These are best added as 6 seperate resistors (one for each injector wire at around 5-6 ohms each) on an aluminium heatsink and these can be installed down near the ECU to maintain a stock look in the engine bay. It is NOT RECOMMENDED to put extra injectors before the inlet butterfly valve as a means of achieving extra fueling. This will result in uneven fuel distribution between the cylinders with the front cylinders running rich and the rear cylinders running lean. This can result in severe damage to the engine as evidenced by at least one of the NZ Mkiv club members. Injector SizingOn the mkiv TT Supra its very easy to size the injectors. The maximum brake horsepower all 6 injectors will support is exactly the same as the size of the injectors. So 430cc injectors will support up to 430bhp, 550cc injectors will support up to 550bhp, 720cc injectors will support up to 720bhp, etc. To compare to rwhp, multiply the bhp by 0.8 and you will have the max rwhp these injectors will support. Remember, this is at 100% duty cycle so to be on the safe side multiply by 0.8 again to get to 80% duty cycle. To make this easy for you here are my figures for 100% and 80% duty cycle:
A good article on the injector upgrade process with detailed info and pics is Lindsay's upgrade to 550cc export injectors article. The USA injectors will support up to 550bhp (100% duty cycle) and will cover anything the USA or Jap turbos can produce. |
| Inlet & Exhaust Cam upgrading |
|---|
Cam SelectionThe Japanese stock Inlet cam has 224deg duration and 7.8mm lift and the Japanese stock exhaust cam has 233deg duration and 8.25mm lift. The USA inlet cam however has the same duration and lift as the Jap exhaust cam and is a worthwhile upgrade if you are staying with the stock Japanese (or high flowed stock Jap turbos) or stock USA turbos. If you will be upgrading to bigger twins (eg. HKS) or a big single then you should look at upgrading the cams at the same time. There are a number of aftermarket inlet and exhaust cams that you can fit to the Supra. The most common are HKS, Greddy or Blitz cams. They come in various sizes with the most common upgrade sizes for a road Supra being:
Do not go for cams of too high a duration for a road car as turbo'd cars work very well with cams that do not have too high an overlap. This is because too much overlap (which is when both the inlet and exhaust valves are open at the same time) will result in air and fuel coming in through the inlet valves and going straight out the exhaust valves before they close. This will result in high exhaust temperatures (BAD) and less power (BAD) and more fuel consumption (who cares). A maximum of 272deg is the most you should run on a street Supra and even then you will get poor idling, but very good flow at high rpm. |
| Intercooler Upgrades |
|---|
When should I upgrade my Intercooler?The stock intercooler is very good as far as factory intercoolers go and if you are running the stock boost of 11psi then there is no reason to install a FMIC (Front Mount InterCooler) apart from looks. However once you turn the boost up above 16psi (which needs a Fuel Cut Defender) then there are benefits to be gained from installing a FMIC. These are:
What size and brand of FMIC should I install?They say size doesn't matter but when it comes to intercoolers it usually does. A good size for a stock turbo'd mkiv supra running say 18-20psi would be 600mm Wide x 300mm High x 75mm Deep. This should give you all the benefits listed above and should handle up to 300kw at the wheels. If you are running aftermarket turbo(s) and you are making more HP then 300kw at the wheels then you should install a bigger FMIC. A good size for 400+kw at the wheels would be 700mm Wide x 300-400mm High x 100-125mm Deep or bigger if you can fit it in. The gap between the front rails on the Supra is around 790mm so taking account of the end tanks on the FMIC, it will need to fit into this gap. Just one word of caution with FMIC's. They do reduce the amount of air reaching the radiator and that air will be heated as well, so you can cause overheating problems if the FMIC is too big or too deep. A possible option to help alleviate this problem would be to install twin 12" electric fans instead of the factory thermatic fan and tiny subsidiary electric fan(s). There are a large number of aftermarket FMIC's available but unfortunately there is very little data available on flow rates, pressure drop and cooling efficiency available. Spearco who make alot of the cores used in these intercoolers do publish this information, but matching their cores to actual branded intercoolers in well nigh impossible. There are also alot of small companies that make intercoolers and again there is unlikely to be any data on them.There are alot of people that will tell you fitting a large FMIC is going to result in a big increase in lag but to that I say Rubbish! Whatever lag increase there may be from the FMIC will be mainly attributable to using larger diameter intercooler pipework and having an intercooler with much larger end tanks then the factory intercooler. When I created my FMIC using 3 factory intercoolers welded end-to-end I ended up with an intercooler that has a core of 660mm Wide x 270mm High and 125mm Deep. This hybrid intercooler will flow enough air to support over 400kw at the wheels and there was absolutely no perceptable increase in lag. This is because I was using the factory end tanks which are very shallow and the intercooler piping I used was only 63mmID. which is what alot of the factory system is. This piping does flow alot better then the factory setup though as the factory pipework squeezes down to around 55mm as it goes through the side chassis wall down to the intercooler. If you go for a brand name product such as HKS, Greddy or Blitz then expect to pay around NZ$3000 for one. However, a non-brand name intercooler that performs identically can be had from between NZ$1000 to NZ$1500. There are two core types for air-to-air intercoolers and they both have their advantages and disadvantages. The BAR & PLATE type has more pressure drop and a lower flow rate but usually has a higher efficiency. The TUBE & FIN type has less pressure drop and a higher flow rate at the expense of a lower efficiency and will be the lower priced of the two. The factory mkiv intercooler is a TUBE & FIN design. Here are links to two intercooler upgrades done by NZ Supra group members. See Kevin's Tube & Fin FMIC Upgrade or Lindsay's Plate & Bar FMIC Upgrade |
| Intercooler Efficiency |
|---|
|
The stock Japanese mkiv intercooler has to cool 280hp worth of air (same intercooler as Export mkiv) when the motor is at stock hp rating. However as soon as you start increasing the hp (extra boost, high flow inlet, exhaust upgrades, cams, etc) the efficiency of the stock intercooler begins to drop very quickly. You don't believe me? As an example. lets assume we are now getting 400hp out of our mkiv. This is getting near the limit of the Japanese mkiv turbos of about 450hp, so is a good example. If we divide 400 by 280 we get a minimum increase in airflow of 42.86%, or 1.4286 times the airflow. As we haven't changed the intercooler, or the size of the pipes feeding the intercooler, then the air (remember there is 1.4286 more of it) has to flow 1.4286 times faster to get through the pipe in the same time. If we assume the total cooling power of the intercooler is fixed (a reasonable assumption, which I'll discuss later) then there is 1.4286 times the amount of air to cool in 1/1.4286 (or 0.7000) the amount of time. If we multiply these two factors together (1.4286 * 1.4286), you get 2.0409. This means the intercooler is now only 1/2.0409 (0.4900 or 49.0%) as efficient as it was at stock hp. Also, if we are running the stock turbos at higher boost levels to achieve the 400hp, then they will be running at a lower efficiency level then stock, and hence producing more heat, per unit of boosted air produced. This means the intercooler will have hotter air entering then at stock boost, thus further increasing the temperature of the air exiting the intercooler. The intercooler will now be less then 49% as efficient as stock, perhaps about 45% or so. The benefits of an intercooler upgrade become immediatly apparent. What does an efficiency of 45% of the stock intercooler actually mean? Without getting technical, it means you would need more then two stock intercoolers, if they were arranged in series. By series, I mean all the air flows through one and then flows through the second intercooler. However, if you take those same two stock intercoolers and arrange them in parallel (1/2 the air flows through each one) then you can increase hp from 400 to 560 (280 x 2) and still get the same air temperature into the engine. This is because you now have the same amount of air as stock flowing through each intercooler, and the air is flowing through the intercooler at the same speed as stock. I plan to produce some hard data soon, on inlet/outlet temperatures at different boost levels with a stock intercooler, and then with an upgraded intercooler system , to support (or refute) these arguments. My upgraded intercooler system will consist of two stock intercoolers (one in each front brake air entry), with 50% of the airflow going through each intercooler. Theoretically, there will then be about 200hp of air flowing through each intercooler, which should make my system (280 / 200 = 1.40) 40% more efficient than the stock system, with a considerable increase in hp and a large reduction in intercooler exit air temperatures as a result. I welcome any discussion (Email me) on these points I have raised, especially any mathematical analysis of my estimates of the intercooler efficiency drop as more air goes through the intercooler. |
| NA (2JZ-GE) to Turbo (2JZ-GTE) conversion |
|---|
You have 3 main options:
Other considerations:
If you are in the USA then check out Power House racing. They used to do the 2JZ-GE turbo option but now they only do the 2JZ-GE to 2JZ-GTE replacement. They are not cheap but will do a very good job. |
| Availability of repair manuals |
|---|
|
Repair manuals (in english) can be obtained from Toyota Service Publications in California. They can be reached on +1-800-622-2033. Note that these manuals will be for the US/Canadian model, which are slightly different to the Japanese model. Aside from the fact the US/Canadian model use an air-flow meter mounted just after the air-box to measure air-flow, and the Japanese model uses an manifold pressure sensor, the differences between the models are not that great (approx 90% identical), but that’s still enough to make you go double & triple checking things before cutting anything up. Still, they are an invaluable aid to troubleshooting & repairs (the time you save more than makes up for their purchase price) – easily the best couple of hundred dollars you can spend on this car. Repair manuals can also be ordered in New Zealand from most Toyota Dealers. |
| Smoke & what the different colours mean? |
|---|
|
BLACK - too much fuel |
| Spark plugs - good & bad types for Supra. How to read them? |
|---|
|
Platinum tipped plugs are a no-no, as they retain too much heat which in turn can cause detonation. I’ve used both Champion & NGK copper plugs in mine (part numbers ???) & the car’s been fine. If you are running higher boost then stock drop down one heat range in the plugs and two heat ranges if running around 20psi or more. Also the gap should be closer at around 0.7-0.8mm to further reduce misfiring. Most misfiring at high boost is due to plugs and these should be the first item checked if you have misfiring problems. |
| Maximum Speed Calculation |
|---|
|
The top speed of the Export Supra (320hp) is about 273km/h (169.6mph) with the speed limiter removed. This is based on an average of several magazines figures. If we assume that 10% of the rwhp goes to overcome rolling resistance (a reasonable guess), then 90% is used to overcome air resistance. As we have 272 rwhp (320hp * 0.85) less 10% for rolling resistance, gives us 245 rwhp (272 * 0.9) available to overcome air resistance, so we can get to 273 km/h. If we double the speed we are travelling at, the rwhp required to overcome the extra air resistance is cubed. Based on these facts, we can now come up with a formula to calculate the maximum speed of the mkiv Supra at any hp rating. The speed cubed (273 * 273 * 273) divided by the rwhp (245) gives us a conversion factor of 83,047. This conversion factor allows us to work backwards and calculate the rwhp required to reach any other desired speed. For example, the 280hp available to the Japanese Supra gives 238 rwhp (280 * 0.85) of which 214 rwhp (238 * 0.9) is available to overcome air resistance. This equates to a maximum speed of 261 km/h (162 mph). The formula is: (261 * 261 * 261) / 83047 = 214 rwhp to overcome air resistance. Now, to get to the flywheel hp we take the 214 rwhp and divide by 0.9 to get to the total rwhp and then divide by 0.85 to get to the flywheel hp (214 / 0.9 / 0.85 = 280hp) of 280, which is the flywheel hp of the Japanese TT mkiv. Check out what the maximum speed of your mkiv Supra is based on the table below.
|
| Speed (km/h) | cdx RWHP | Total RWHP | Total Flywheel HP |
|---|---|---|---|
| 240 | 166 | 185 | 218 |
| 250 | 188 | 209 | 246 |
| 260 | 212 | 235 | 277 |
| 270 | 237 | 263 | 310 |
| 280 | 264 | 293 | 345 |
| 290 | 294 | 327 | 384 |
| 300 | 325 | 361 | 425 |
| 310 | 358 | 398 | 468 |
| 320 | 395 | 439 | 516 |
| 330 | 433 | 481 | 566 |
| 340 | 473 | 526 | 618 |
| 350 | 516 | 574 | 675 | Of course, these speeds are dependent on gearing as the specified amount of rwhp needs to be available at the speed specified. As most tweeked Supra's develop maximum power at 6500-7000rpm, the speed in 6th of 45 km/h per 1000 rpm, gives a maximum speed of 315 km/h at 7000 rpm, unless the gearing is increased or the rev limit raised. To get to the "MAGIC" 200 mph (322 km/h) mark, requires 446 rwhp or about 525 hp. |
| What's the best conrods for my Supra? |
|---|
|
There are a number of different aftermarket conrods available for the 2JZ-GTE SUpra. One important point to remember with rods is that they are only as strong as the rod bolts you are using. The ARP 2000 are good for 220,000 psi and the ARP625 are good for 260,000 - 280,000 psi as are the Carr multiphase bolts. As the rod bolts can often fail before the rods do, buying the best quality rod bolts you can afford for the rods you choose to run is very important. I'll list them in the order of what I believe to be the weakest to the strongest rods. Remember its up to you to make sure the rods you buy are suitable for the power levels you plan to make. up to 450rwkw - factory 2JZ Supra rods (746 grams) and bolts - the 2JZ-GE and the 2JZ-GTE both use the same rods. These rods are good for 450rwkw so long as you don't get any serious detonation occuring. If you do then they can bend and will ultimately break as can any rod that suffers severe detonation. up to 550rwkw - Eagle H beam (590 grams), Scat H beam (546 grams), Spool H beam (550 grams) up to 600rwkw - Carrillo Pro A beam with H-11 or ARP 2000 steel bolts up to 650rwkw - Crower I beam, Oliver I beam, Manley Turbo Tuff I beam, GReddy H beam up to 700rwkw - Brain Crower H beam (580 grams) with ARP 625 bolts up to 750rwkw - Pauter rods (680 grams) with ARP 2000 bolts. These are a unique design something like a cross between an H and an I beam up to 800rwkw - Pauter rods (680 grams) with ARP 625 bolts. These are a unique design something like a cross between an H and an I beam up to 900rwkw - Carrillo Pro H beam (595 grams) with SPS/Carr multiphase steel bolts over 900rwkw - Crower titanium rods (392 grams), Pauter titanium rods (approx 450 grams) |
| How do I remove the *#%$@! 180kph speed limiter? |
|---|
|
Unlike the US/Canadian models, the Japanese Supra’s 180kph speed limiter cannot be removed simply by pulling out the fuse that supplies power to the traction control ECU. If you don’t want to go to the expense of buying a complete after-market ECU, you need to buy a Speed Limit Defencer (SLD) to do this. The SLD is about the size of a box of Camel cigarettes, and can be purchased from any of the Japanese parts suppliers (eg HKS, Greddy) for about $US100. The SLD works by intercepting and then modifying the signal that comes from the speed sensor on the gearbox, so that the main ECU always thinks that the car is doing less than 180kph, even if it is doing more than 180kph. Typically, it is situated near (or stuck to the back of) the main engine ECU. The unit needs +12V and ground. On the main ECU, the wire that carries the signal from the speed sensor is unplugged from the main ECU, and rerouted into the SLD. The output of the SLD is then wired back into the terminal on the ECU where the signal from the speed sensor was previously plugged into. |
| Torsen LSD vs TRD LSD |
|---|
|
The Torsen diff is a standard fitment to all 6 speed mkiv's, alot of the Auto TT's and you'll even occasionally find it on a NA. You can tell if your Supra has a Torsen diff by reading the Trans/Axle code on the Engine Tag which is situated under your bonnet. The last letter of the 4 character code (eg. B03B) denotes the diff type which is "A" for a std diff and "B" for a Torsen diff. The crown wheel on the B series is 220mm whilst on the A series it's 200mm. The Torsen (TORque SENsing) LSD (Limited Slip Diff) works quite differently to the TRD LSD. The Torsen is a Torque Multipling type of diff with a multiplication ratio of around 5:1. What this means is that whatever torque can be sent to the wheel with the least traction, it can send up to 5 times that torque to the wheel with the most traction. Its biggest advantage is that it can do this extremely quickly and doesn't ever lockup the ratio, but is continuously "sensing" and adjusting the torque between the two wheels. Its only real disadvantage is that when one wheel has no torque available (say it spinning in mud), then 5 times nothing is still no torque to the other wheel, so you can get stuck just like a std diff. Once the car is moving however this cannot happen. See this Torsen Differential Article for a detailed explanation of how the Torsen diff works. The TRD LSD is a standard type LSD in that it uses clutch packs to transfer torque from one wheel to the other. Transferring torque via clutch packs will be a slower process then the Torsen transfer method and it will absorb more energy from the engine when doing so. However we are probably only talking a few hundreds of a second difference here and maybe a few hp. The main disadvantage of the TRD diff is that it can "lockup" the ratio between the two wheels at 1:1. This means both wheels will then turn at the same speed and if this happens on a corner, it would be exciting at the very least. This "lockup" is also its only advantage over the Torsen diff as even when one wheel is in the mud, the other wheel can provide traction to pull you out. My personal preference is for the Torsen diff as it usually comes free with the car, reacts quicker and aborbs less power and will never accidentally lockup. However, if you want to go rally driving in your mkiv Supra (don't laugh, there's guys in the USA that do just that) then the TRD would be the better bet.
|
| Traction control - good or bad? |
|---|
|
On several occasions, I (Kevin) have found the traction control on my TT to be EXTREMELY DANGEROUS. This is because it is too good. When it activates, due to rear wheel spin, it dials the power back far too much, leaving you with no more then idle hp. In the wet, or on gravel, it is easy to spin the rear wheels when starting off, and several times I have almost been hit by another car when pulling out to cross a road and having the traction control suddenly kick in. I now always turn the traction control off, when it starts raining or I'm on gravel, to prevent this happening. I will be removing the traction control entirely, hopefully at the same time I do my intercooler upgrade. But won't this make your TT more dangerous by not having any traction control? I have raced my car in both the dry and the wet (always with the traction control turned off) and because the LSD requires both rear wheels to spin, it is quite difficult to promote rear end breakaway, but obviously possible, if you overdo it. Personally, I think that as long as you drive to suit the conditions, then it is safer to not have traction control, due to the above mentioned risks when pulling out into traffic on wet or gravel roads. If anyone else has had similar situations with the traction control, then (let me know) so other readers can be that much more aware of the dangers of traction control. My experience (Joe) with it has overall been bad. I have it almost permanently turned off (fuse supplying power to the traction control ECU pulled in the main fuse box in the engine bay) now. What I found was that when you had a small lose, it worked okay. But, when you had a big lose, it cut in way too late to save you, and when it did cut in was when you’d be trying to power-out of the situation – ie when you least expected it, or wanted it to !! Worse still, after you’ve recovered from the situation & regained traction, it continues to cut power for quite some time – bloody annoying. You can also totally remove the butterfly valve used to activate the traction control (there is a kit you can buy to fill the holes left or you could just get them welded up). This also has the advantage of removing an unnecessary air restriction in the inlet manifold. This butterfly valve is the front one on the inlet manifold. The rear one is the throttle control butterfly. |
| True Twin Conversion |
|---|
|
The mkiv Toyota Supra has a sequential turbo setup. What this means is that the #1 turbo (the one at the front of the engine) initially receives all the exhaust gas from the engine. Because its receiving all the exhaust gas, the turbo spools up very quickly and one can be getting boost from 1800rpm (or less). This makes the car feel like a NA 4.0L car when just cruising around town, which feels really great. When you put the "pedal to the metal" the #2 turbo will also come on line. How this works is that at about 3500rpm, the #2 turbo is pre-spooled by a small amount of exhaust gas being transmitted through it by opening the "exhaust bypass valve". This spins the turbo up to speed but doesn't produce any boost at this point. At about 4000rpm, the "exhaust gas control valve" opens which then allows full exhaust flow through the #2 turbo (as well as the #1 turbo). The #2 turbo then immediately starts producing boost. As soon as this boost pressure equals that of the #1 turbo, the "intake air control valve" opens which lets this boost join the intake airstream and you now have two turbos both on-line. The sudden influx of boosted air from the #2 turbo (gives a big power surge) makes it feel like the #2 turbo is a bigger turbo (it isn't, they are both the same size) but its just because the #2 turbo suddenly comes on-line. Now the whole point of this article, the True Twin Conversion. What this means is converting the turbos to operate in parallel (both together) instead of sequentially. This can be done with about 30 minutes work, a pair of pliers and 30cm of heavy copper wire. See www.mkiv.com for a detailed article on how to do this if you want to. What you end up doing is wiring open the "intake air control valve" at the top of the engine and also the "exhaust gas control valve" near the bottom of the exhaust system. This results in both turbos being on-line the whole time. What happens if you do this? When I tried it on my Japanese spec mkiv TT 6 speed, the results were not good. There was no boost below 3000rpm and it got to about 12lb by 4000rpm and max boost by 5000rpm. This resulted in extremely poor low down torque (felt like an NA 2.0L) and was a much harder car to drive quickly around town. When I tried it at the drag strip it was also not very good. Unless I changed the gears at the redline, it would bog down and I would get a slow high 13 second pass. Changing at the redline dropped this to a best of 13.5sec, which is still slower then it should do with 227kw at the wheels. I have changed the turbos back to sequential and am really enjoying the huge low down torque this gives. I'll also update this article next week when I take it back to the drag strip and see what it does running sequential turbos. |
| Japanese CT12B ceramic turbocharger |
|---|
|
Toyota unfortunately has never published the compressor maps for its turbos. The CT12B is manufactured by Hitachi for Toyota. Toyota then assemble the parts provided by Hitachi. It's a pretty good turbo when it comes to efficiency and response, but they fail a lot on the Supra TT. The #2 turbo seems to be the one that fails all the time. I know this from personal experience, as my #2 turbo's ceramic turbine disintegrated while racing at Pukekohe (20lb boost while doing 240 km/h down the back straight) and shot out the exhaust as a puff of black smoke. The car was still quite drivable, with a maximum of 2lb boost, as most of the exhaust gas was now going out the #2 turbo. 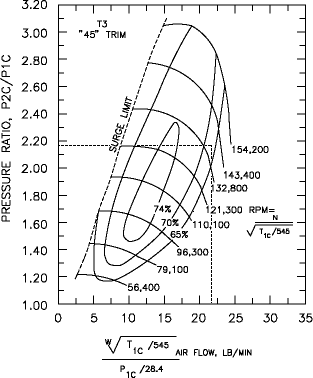
This compressor map is actually for a Garret T3 45 trim, but should be similar to the Japanese ceramic CT12B turbo, as they top out about 200-225hp (21.7-24.4 lb's of air) each, giving a total maximum power of 400-450hp (43.5-48.9 lb's of air) at the flywheel for the Japanese mkiv. Turbo Airflow Example:My car currently dyno's at 220kw (295hp) at rear wheels (Torque Performance Dyno) at 6500rpm at 17psi boost. This is a Pressure Ratio(PR) of 2.156. This is calculated using the following formula: (17+14.7) / 14.7. Now assuming 400hp at the flywheel (295 * 1.3 = 384hp rounded up to 400hp for this discussion) and allowing 10.865 lb's of air for each 100hp, the turbos are then flowing 43.5 lbs of air at 17psi boost. This is 21.7 lb's of air for each turbo, which is the dotted line drawn on the Compressor map above. This shows the turbos running at about 67% efficiency at a PR of 2.156, assuming a similar efficiency as the Garret T3 45 trim. The most powerful Jap mkiv (with std Jap mkiv turbos) I know of, has 265kw at the rear wheels, which is approximately 420hp at the flywheel. If anyone has a dyno sheet for a Jap mkiv with more hp (and std turbos), then email me so I can update this information. |
| Mkiv Turbo Misconceptions |
|---|
|
There is ONLY 1 wastegate, which is on the #1 turbo. The #2 turbo is also controlled by this wastegate as the exhaust manifold is common to both, allowing exhaust gasses to bypass both turbo's, when going out the wastegate. What appears to be a wastegate on the #2 turbo, is in fact the exhaust bypass valve, which is used to pre-spool the #2 turbo during the transition to the #2 turbo coming on line at about 4000rpm. Both turbo's ARE the same size. The boost comes in with a rush from the #2 turbo due to the #2 turbo boost building up to a least the same level as the #1 turbo before being introduced into the intake stream. This effectively means the volume of air flowing through the intake doubles (or close to it) when the #2 turbo comes on line. The two turbos ARE sequential in action. Below around 4000rpm, all the exhaust gas goes through the #1 turbo (because an exhaust valve stops it going through the #2 turbo) which gives good low speed response from the car. As revs increase, at around 4000rpm some exhaust gas is feed to the #2 turbo due to the exhaust valve partially opening. This then spins up the #2 turbo and it starts producing boost. This boost has nowhere to go (as there is another valve that stops this boost entering the engine) so the boost pressure quickly builds up to a higher pressure then the #1 turbo is putting out. At this point two things happen at the same time. The exhaust is now allowed to flow through both turbos equally (the exhaust valve is fully opened) and the valve stopping the boost from the #2 turbo is opened so that boosted air can then enter the engine. This gives a sudden increase in airflow to the engine as we suddenly have two turbos on line instead of one. This is what gives the feeling that a bigger turbo has taken over. |
| Turbo Upgrades |
|---|
|
The common HP options for a standard engine are:
Some common proven single turbo options for a standard 2JZ-GTE engine are:
|
| VVTi - Variable Valve Timing - intelligent |
|---|
|
VVTi (Variable Valve Timing - intelligent) - the US TT model never had VVTi while the Japanese TT did. The US had a 2JZ-GE VVTi engine and the Japanese 2JZ-GTE models had VVTi, which was introduced in September 1997. |
| Wheel alignment for the Supra | ||||||||||||||||||
|---|---|---|---|---|---|---|---|---|---|---|---|---|---|---|---|---|---|---|
|
Well, after 3 sets of tyres, I arrived at the following wheel alignment specs, which cause the rear tyres to wear absolutely evenly (even the guy in the tyre shop said that he’d never seen anything like it). These specs are for stock suspension, street use, with 18” rims, and assume that 99% of the time there’s only ever 1 person in the car.
Another set of alignment specs which is said to be good for tyre wear comes from Lance Wolrab, on mkiv.com.
If you find the inside of the rear tires is wearing out first, reduce the camber of the rear tires to around -0.5 degrees and this will fix the problem. This will reduce rear grip slightly under hard cornering so take this into account if driving hard. | ||||||||||||||||||
| Correct wheel offsets |
|---|
|
Factory 16" wheels - Front 16x8 - 50mm offset, Rear - 16x9 - 50mm offset Factory 17" wheels - Front 17x8 - 50mm offset, Rear - 17x9.5 - 50mm offset |