| Manual Boost Controller Setup | ||
|---|---|---|
|
If you are wanting to use a manual boost controller, there are two options for achieving this. I have tried both them and they both work to varying degrees. This article is mainly based on a discussion in the SR20 forums called "The basics of boost control, wastegates and how to turn up the boost" at www.sr20-forum.com No boost controller methodThis is just using the wastegate without any controller at all. The boost pressure works against the spring that is holding the wastegate shut. As the pressure rises the wastegate creeps open proportionally. There's a point where everything reaches equilibrium, but there is a relatively long amount of time that the wastegate is creeping open. This is bad for quick boost onset which is why you need either a manual or an electronic boost controller. This article only discusses manual methods of controlling your boost. The Bleeder methodFirstly, you can "bleed" off some of the signal to the wastegate with a controlled leak in the pressure line going to the actuator. This method is simple and reasonably effective but is usually overlooked as the next method is better and no harder to implement. The bleed can even be an adjustable valve that is controlled from inside the cabin. "Dial-a-boost" they like to call it. This is one method of manual boost control. Many say manual boost controllers cannot be controlled from inside the cabin, which is untrue. This method can be employed typically for $20. While it works, is a not a great way of increasing boost. You are making a boost leak in order to lower the pressure that the wastegate sees. This gives the turbo a very pronounced "laggy" and unresponsive feeling. These types of boost controllers are also very inconsistent as temperature changes. You may set your boost to 14 psi when it is 10degC outside, only to find out that you are boosting 19 psi when the temperature reaches 30degC. Having said that, I used this method for several years on my Supra when it was twin turbo and had no problems running up to 20 psi boost with little or no boost spiking. Traditional manual boost controller methodThe next method involves a one-way ball-and-spring check valve. This is what is typically referred to as a "manual boost controller". This is placed in the signal line. The device has an adjustable spring inside which takes over the job of the original actuator spring. Set the pre-load on the spring to whatever psi you'd like and the wastegate actuator will see only a little pressure until that level is reached. This method is simple, cheap, and marginally configurable (adjustment can also be routed into the cabin for control from inside the car). Even set at the same psi as the original wastegate spring, this method gives quicker spool than normal, as it doesn't allow the wastegate to "creep" open before the desired boost level is met, causing full boost to come on quite a bit sooner.Many people believe this method is flawed or unreliable, causing dreaded boost spikes and the like. While I don't doubt others have experienced this, I know with a properly set-up turbo system, there should be no problems. Alot of people never experience boost spikes at all when using this method. This method can be employed typically for around $100. I currently use this method on my Masterpower T70 Supra running up to 26 psi boost (with a 14 psi wastegate spring) and get no boost spiking at all. The traditional manual boost controller allows for quicker boost onset then just using the wastegate alone. Assume a system is designed for 14 psi. Assume the wastegate creeps from 7 psi to 14 psi (typical for internal wastegates, as slack in the actuator exists). We now have a wastegate system with typical ball and spring check valve (manual boost controller) installed inline. The boost pressure works against the spring in the check valve this time creeping it open as it does the wastegate, however there are two things to note here. The amount of force the spring sees is based on the surface area of the ball in the check valve. Pounds per square inch, remember? So presumably the ball is much smaller than the entire diaphragm in the wastegate. This allows for a higher degree of control over how much pressure it takes to open it. Regardless, the real difference comes when you realize there will be a pressure differential between the manifold pressure and the pressure seen after the partially open check valve. As the check valve is creeping open there may be 10 psi on the manifold side, and 3 psi on the wastegate side. This 3 psi is not even enough to begin to open the wastegate. Soon you're at 12 psi and the wastegate may only see 7 psi, still not enough. Next you're at 14 psi, the check valve is fully open, and now the wastegate sees 14 psi, and fully opens as well. This is my explanation from what I've seen in practice. For what ever reason manual boost controllers allow for just as quick a spool as perfectly tuned electronic boost controllers. Manual Boost Controller Setup methodsMethod 1Boost control methods that work by limiting the pressure to the bottom of the wastegate diaphragm and don't add any pressure to the top of the wastegate diaphragm are limited in the maximum boost they can achieve. Examples of this method are the bleed method, and the tradition manual boost control method using only a ball-and-spring check valve. Often you'll hear people say things like "manual boost controllers can't make more boost than twice the wastegate spring pressure". This isn't exactly true. There are manual boost control methods that do not have this limitation. There are many variables to take into account, but the claim does have some basis in fact. There is a boost pressure amount that correlates to high enough pressure in the turbo exhaust manifold that the pressure in the manifold will push the wastegate open on it's own. This is the crux of the problem. Usually this happens on external wastegates somewhere around twice the boost pressure that the wastegate spring can hold on its own. So if the wastegate spring on its own would produce 6 psi, the max boost obtainable by some methods will be around 12-14 psi. This is because the pressure in the manifold overcomes the spring pressure and forces the wastegate open. This isn't true for all setups, but it's a general rule of thumb to go by. This is the method I'm currently using on my Supra. I get 26 psi at full boost with the boost dropping down to 22 psi at max rpm which is typical of this method of boost control. Internal wastegates are a little different because they have a lever in the system. This lever makes it easier for the wastegate actuator to open the wastegate flap, but it makes it hard for the exhaust manifold pressure to force open the wastegate so usually you can make three times as much boost on an internal wastegate instead of only two times. 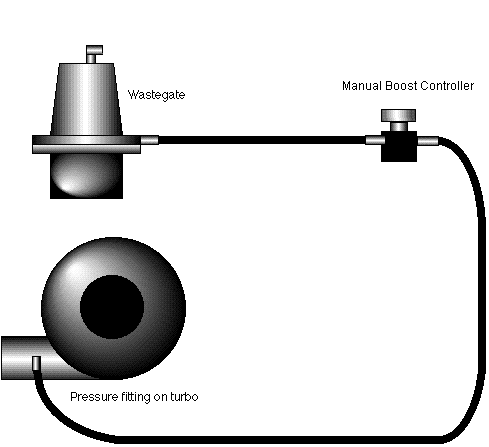
Method 2The intake charge pressure works against the wastegate spring like normal, but some of that pressure is redirected to the top of the diaphragm to help the spring. This makes the pressure on the top side of the diaphram higher, so it will take more boost pressure below it to open. If you set the pressure regulator for 1 psi, it will add 1 psi of helping pressure to the spring so it should take 1 psi more to open the wastegate than normal. Set the pressure regulator higher to obtain higher boost levels. My only concern with this method is that boost pressure may build up in the line between the regulator and the top of the wastegate. To stop this, you will need a small boost bleed in that line so that any excess pressure in this line can bleed out. This means the regulator will need to be adjusted a bit higher ,but this is the only way round this issue. I do not know how well this method works as I have not tested it, and as such it should not be tried unless you are willing to accept responsibility for any damage it may cause to your engine. This method will help retain a stock-like wastegate opening speed (slow) if that is something you desire. For this reason, I will not be trying this method on my Supra. 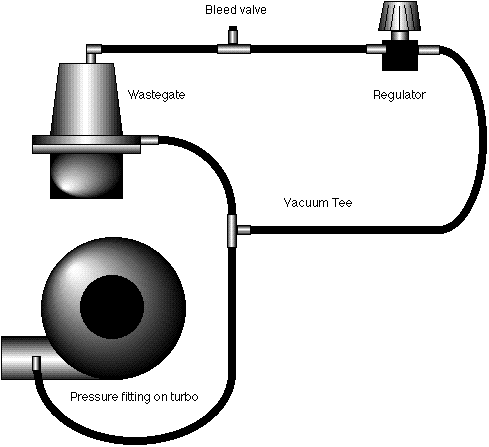
Method 3This is a combination of methods 1 and 2. I have not seen this method used anywhere before, but believe it should combine the best features of method 1 and method 2 to achieve a stable boost curve while maintaining fast spooling of the turbo. I will try this method in the next month or so but until then, it is a completely untested method and as such it should not be tried unless you are willing to accept responsibility for any damage it may cause to your engine. I will update this article as soon as I test this method. To test this method, I will first set the regulator to allow 6 psi of air through it, which will add 6 psi of air to the top of the wastegate whenever boost pressure is above 6 psi. This will raise the effective spring pressure of my wastegate from 14 psi to 20 psi. I will then set the manual boost controller to 26 psi ( it's already set at that, so this parts easy). With the wastegate now needing 20 psi to open, it will not start to open until the manual boost controller lets at least 15 psi of air through which it should not do until boost reaches 26 psi as any boost leaking through the manual boost controller at lower boost pressures should be less then that. This will maintain the fast spool up (as good or better than any electronic boost controller) and with the wastegate effectively set at 20 psi, the boost curve should stay nice and flat at 26 psi right up to max rpm. To lower boost below 20 psi and still achieve a fast spool up, I would need to adjust both the manual boost controller and the regulator by equal psi which would be a PITA to achieve. However as 20 psi is a good street boost pressure, thats not a problem so I would just adjust the manual boost controller only down to 20 psi to achieve 20 psi for the street. 
| ||
Thanks for visiting mkiv.co.nz
Last modified on Sunday, December 19th, 2010